1. i started with some reference pictures of an egyptian style doorway, i then began to model the right shape i wanted by extruding faces for the most part, i modelled half the door and then mirrored it to the other side, the door itself was practically a simple slanted rectangle.
2. once the door was built i had to split the faces to give myself enough to work with once sculpting could begin. i repeated this process till the whole door was split up evenly, i then tidied up and deletes excess vertexes on the model to make sure mudbox did not get confused.
3. i then UV mapped my doorway and door, using planar mapping entirely as the whole thing had flat surfaces, i layed them out as neatly as i could.
4. i then brought the door into mudbox after exporting the file as an .OBJ, i froceeded to sculpt my egyptian sandstone detail in until i was happy with the final outcome, i only brought the doorway in and not the door itself, the door would be done purely in photoshop.
5. next i brought the uv's into photoshop to apply a sandstone colour pallete, i reapplied the texture to the doorway in maya to make sure it applied correctly.
6. the next step was to make the hyroglyphics to go on the door itself, i took my hyroglyphics texture and applied it over the uv snapshot i took of the door.
7. i then baked out my normal map for the doorway, applied it as a bump map to the door in maya, and then altered the intensity of the sculpt texture to make sure it didnt go overboard when it was rendered.
8. finally i tidied up the textures, adjusted the lighting and added some area lights to create a nighttime egypt effect, i am pleased with the final result.
Sunday, 15 May 2011
Sunday, 8 May 2011
Rigging progress
our rigging consists of having to follow a tutorial from http://www.rigging101.com/ , to create a rig called the 'reverse footlock' this rig means that the whole leg can be controlled with a foot in reverse position situated underneath the foot of the actual joint, hence the term 'reverse footlock
 1. to start off i downloaded the prebuilt pair of legs from the VLE, and created a joint for the hip, the knee, the ankle, the ball of the foot, and a straight edge to the toe, i begun with the left leg and would proceed to mirror the joints later, all of the joint were placed in the side orthographic view using the joint tool.
 2. next i positioned the joints along the side of the leg they would go inside later, this was all checked in the perspective view to make sure the joints were anatomically accurate.
 3. Next i added an IK RK solver from the hip to the ankle, or 'IK Handle', also to make it easier to select each joint, i named them accordingly, eg. 'Hip_L or Ankle_L'. the IK handle acts like a puppet string, to understand where the joints connect. i also created a NURB circle, placed it to the vertex of where the knee joint is located, and moved it out so it wasnt touching the geometry, i then selected the circle, and then the i selected the IK handle on the ankle, and created a pole vector on the NURB circle, now i have an easier way to control where the knee tilts as it moves.
 4. next i added an different kind of IK handle, i placed an IK SC Solver to the ankle, ball, and toe joints. and as usual, named them 'IK Handle ball' and so on and so forth to prevent confusion later.
 5. Next i went into the side orthographic view again, as it was time to create the set of joints that would form the reverse foot, i made the leg joints a layer of their own to make it easier to hide them if necessary, i created a joint from the base of the foot, and then the toe, ball, and ankle, but in reverse, i then names the joints accordingly.
 6. for the next step moment i moved the reversefoot joints into place (just under the existing leg joints) i then proceeded parent the ik handles for each of the foot joints to it's reverse foot counterpart, once it was all linked together i had full control over the entire leg by simply moving the reverse foot around. i also coloured the leg joints and everything on the layer yellow for visual aid.
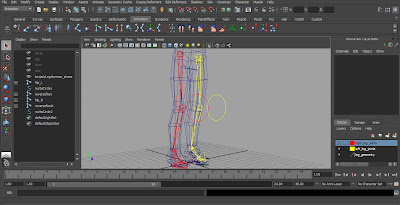 7. given that one of the legs was now complete i had to then do the same for the right, which was simply a matter of mirroring the joints, with the YX axis, and making use of the auto rename function, given all my left joints had the text '_L' for left, i told the tool to replace '_L' with '_R' for the new mirrored joints, making it simple to understand and meant i didnt have to rename them manually, i then took the new set of joints off the existing layer and gave them a layer of their own, coloured red, (i will now associate red with RIGHT) all i had to do after was do the same for the reverse foot, re-parent the new joints to the new leg, and recreate the pole vector with a new NURB circle for easier movement.
 8. next i linked the joints to the leg mesh by selecting the skin menu, bind skin, then smooth bind, which linked the rig build to the legs, so i then had primitive leg movement, but it would deform once it was moved to a certain point, so what's left is to paint the weights where necessary.
 9. next i created a joint for the base if i were to build a spine on top of the leg rig, i joined it to both of the hip joints so i now have a waist joint.
 10. i then painted the weights onto the leg mesh, i tried to make the weights as accurate as i could on the left leg one joint at a time, making sure the deformation was correct as it moved, i then found out how to mirror the skin weights onto the other leg, made slight adjustments and now have it as accurate as a can.
 11. when the weights were painted to the best of my ability, i then animated the legs to show the deformation with the click of a button as opposed to having to manually move them around, i animted each leg doing the same thing, and then the knees rotating with the legs movement to display to correct use of the pole vector.


Friday, 6 May 2011
CS research 2
given how the essay this term has to be somehow linked to representation and space i have decided to do mine about how sound plays a huge role in games throughout the years as possibly being the most important factor in immersing the player in the atmosphere, given that if you were to play a game with the sound turned down, it would be a different experience all together, usually for the worse.
i have been looking at the case study on http://www.diagra.org/ about audio only games, and the role they play in video games history, and also their origin.
Written by Niklas Röber and Maic Masuch from the Games Research Group in the Department of Simulation and Graphics at the University of Magdeburg, Germany. these types of games first showed up in the 1960's and have really begun to spring up in the masses in the past decade, '' The main difference to conventional games is that these games can only be played and perceived through sound and acoustics.''
Even though they were originaly designed for the visually impaired, they posess huge potential for 'on the move' play, to be enjoyed anywhere and everywhere, '' Over the last decades, the notions of play and games have changed, and are today often referred to as the play of audiovisual computer games''
Friday, 29 April 2011
CS research 1
low poly character vs high poly character
 Banjo (banjo kazooie)
Banjo first appeared in the hit n64 title 'Banjo Kazooie' released in 1998.
Banjo-Kazooie was originally known by the project name Dream for the Super Nintendo Entertainment System. The project starred a boy named Edison, who owned a wooden sword and got into trouble with a group of pirates led by Captain Blackeye. Dream was also scheduled to include a rabbit that looked like a man, a dopey dog, and a bear that became Banjo. After its code was transferred to the Nintendo 64, it was shown at the 1997 E3 as Banjo-Kazooie.
 Low poly banjo
banjo's character model looked impressive in 1998, but looking back you can tell how much they must have stretched the boundaries of the hardware to get such high detail out of relatively low poly characters, whereas most of the clothing in the n64 era was simply textured onto the model, banjo actually had his modelled on, to add some much welcome depth given his was the model you would be looking at the entire duration of the game, most of the detail in othe characters relied heavily in the texturing to represent details in the clothing/face, and given banjo kazooie was supposed to revolutionise the n64 in the way donkey kong country did for the SNES, they very much used as much space as the hardware would allow.
 High poly banjo
This version of Banjo comes from banjo kazooie 'nuts and bolts' released in 2008, whereas beforehand, most of the detail and assets to the characters had to be represented through texturing tricks or camera angles, with the hardware of the xbox 360 anything they needed to portray they could just physically model in every detail to leave it 100% to the models, for instance, banjos original design in the early renders had almost as much detail as his nuts and bolts render, but due to the n64 they had to texture his necklace on along with the straps of his backpack, but in 2008 they could literally build everything they needed onto banjo.
Primitive sound environment

Banjo first appeared in the hit n64 title 'Banjo Kazooie' released in 1998.
Banjo-Kazooie was originally known by the project name Dream for the Super Nintendo Entertainment System. The project starred a boy named Edison, who owned a wooden sword and got into trouble with a group of pirates led by Captain Blackeye. Dream was also scheduled to include a rabbit that looked like a man, a dopey dog, and a bear that became Banjo. After its code was transferred to the Nintendo 64, it was shown at the 1997 E3 as Banjo-Kazooie.

banjo's character model looked impressive in 1998, but looking back you can tell how much they must have stretched the boundaries of the hardware to get such high detail out of relatively low poly characters, whereas most of the clothing in the n64 era was simply textured onto the model, banjo actually had his modelled on, to add some much welcome depth given his was the model you would be looking at the entire duration of the game, most of the detail in othe characters relied heavily in the texturing to represent details in the clothing/face, and given banjo kazooie was supposed to revolutionise the n64 in the way donkey kong country did for the SNES, they very much used as much space as the hardware would allow.

This version of Banjo comes from banjo kazooie 'nuts and bolts' released in 2008, whereas beforehand, most of the detail and assets to the characters had to be represented through texturing tricks or camera angles, with the hardware of the xbox 360 anything they needed to portray they could just physically model in every detail to leave it 100% to the models, for instance, banjos original design in the early renders had almost as much detail as his nuts and bolts render, but due to the n64 they had to texture his necklace on along with the straps of his backpack, but in 2008 they could literally build everything they needed onto banjo.
Primitive sound environment
Monday, 21 March 2011
Research - egyptian architecture


Subscribe to:
Comments (Atom)